

How To Draw A Girl With Brown Hair
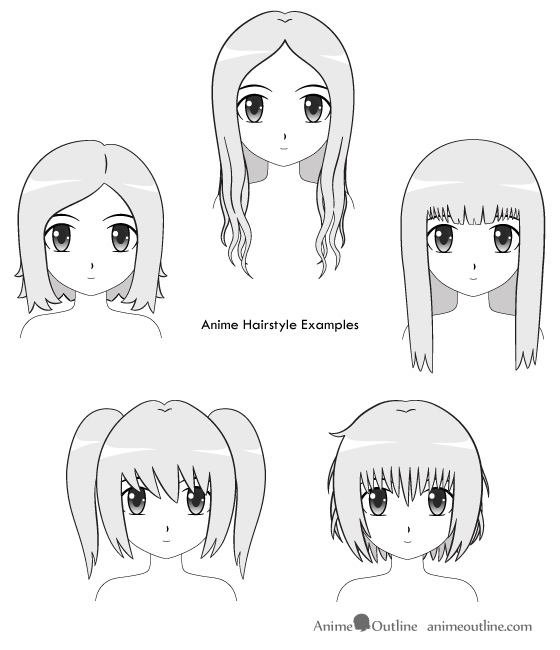
This tutorial illustrates how to describe anime and manga hair with twelve step by step drawings of mutual anime and manga hairstyles for a female character.
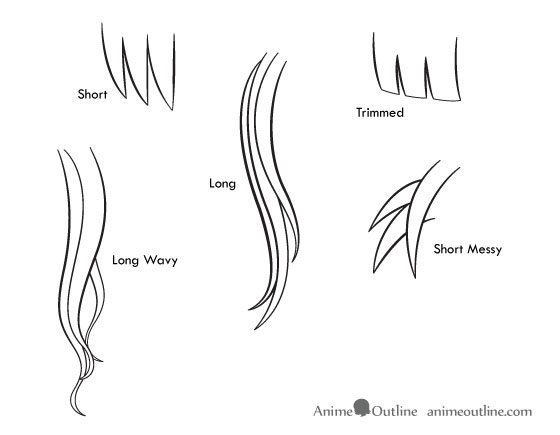
Drawing Anime & Manga Pilus
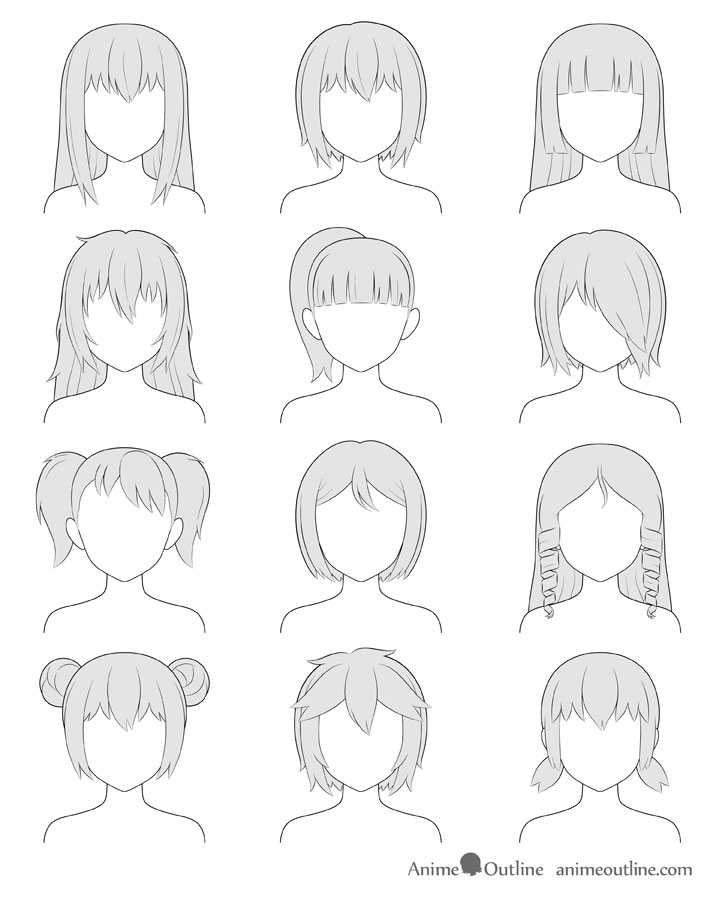
Anime pilus is often based on real hairstyles but tends to be drawn in clumps rather than individual strands. One good reason for this is that if you are drawing multiple frames of animation or multiple panels of a manga it will simply be too time consuming to depict anything overly detailed.
A good arroyo to drawing anime hair is to split it into several different parts such every bit the front end, sides and dorsum/top (equally will be shown for each hairstyle below).
For cartoon characters that tin go forth with these hairstyles encounter:
How to Draw Anime Characters Tutorial
For more than on drawing anime hair you can as well see:
- How to Draw Anime Male Hair Step by Step
- How to Draw Anime & Manga Male & Female Hair
Drawing Long Anime Hair
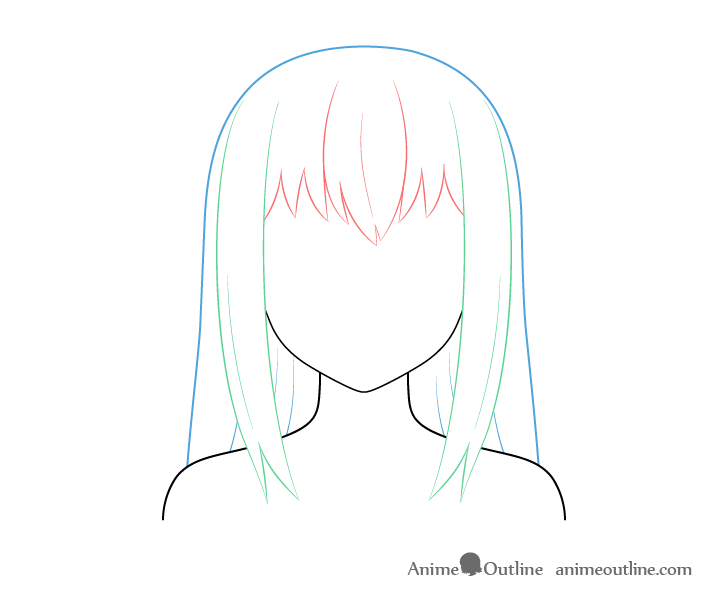
Long straight hair is probably one of the well-nigh common hairstyles in anime and is fairly easy to draw.
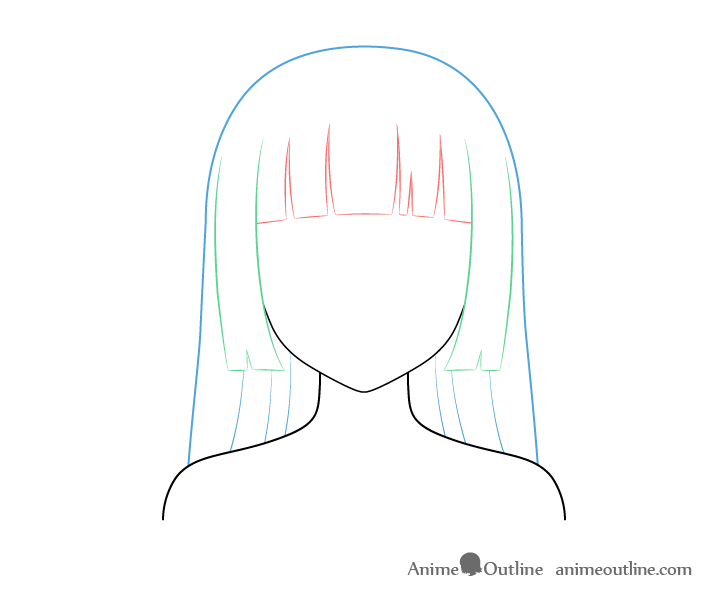
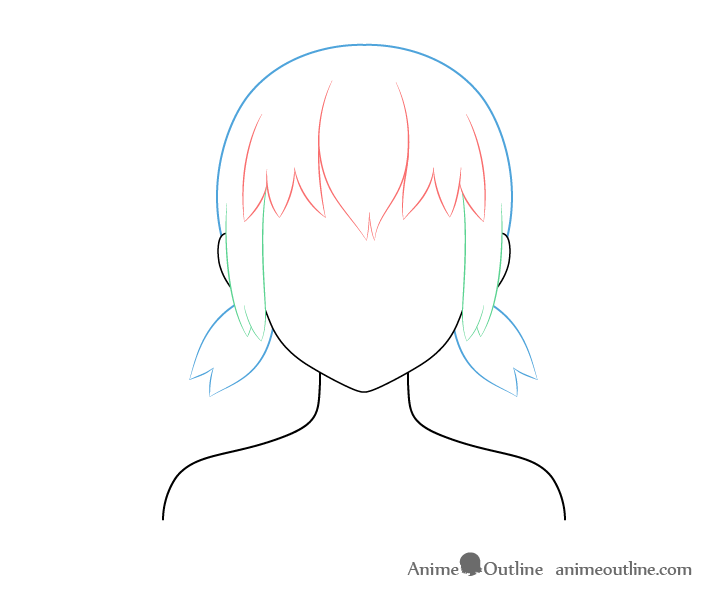
Above you can see the breakup of the long hair drawing example into:
- Red – Forepart Hair
- Green – Side Pilus
- Bluish – Back/Summit Hair
Yous tin can apply a similar breakdown to drawing other hairstyles as well. Thinking of the hair this way can make the drawing process a lot easier to manage.
Keeping this in heed we can motion on to the actual drawing process.
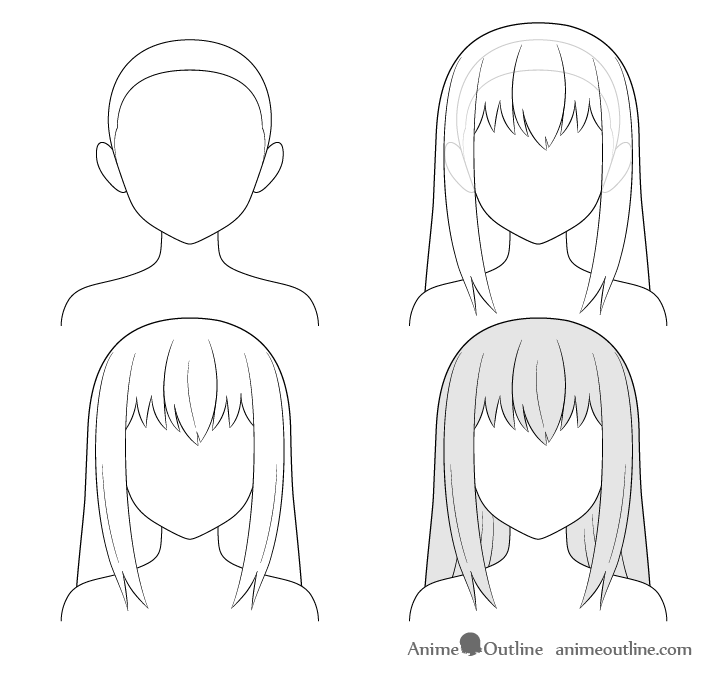
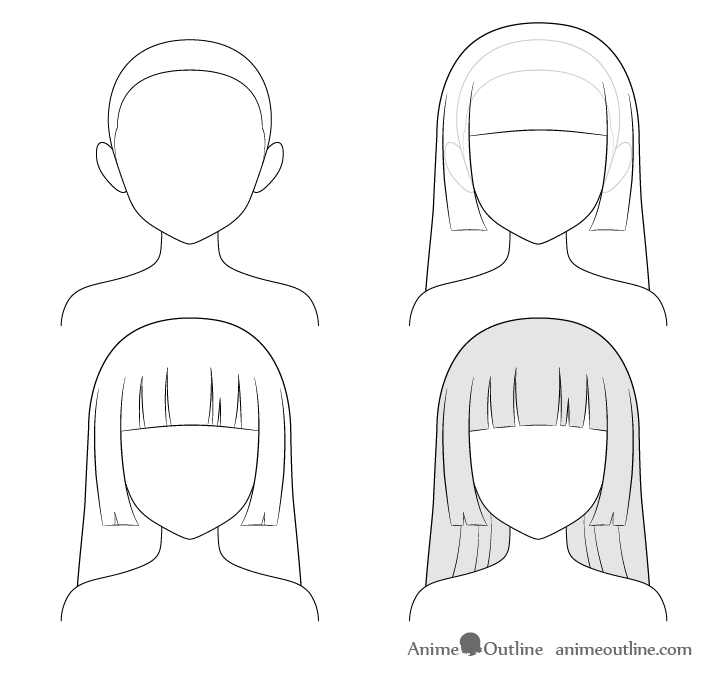
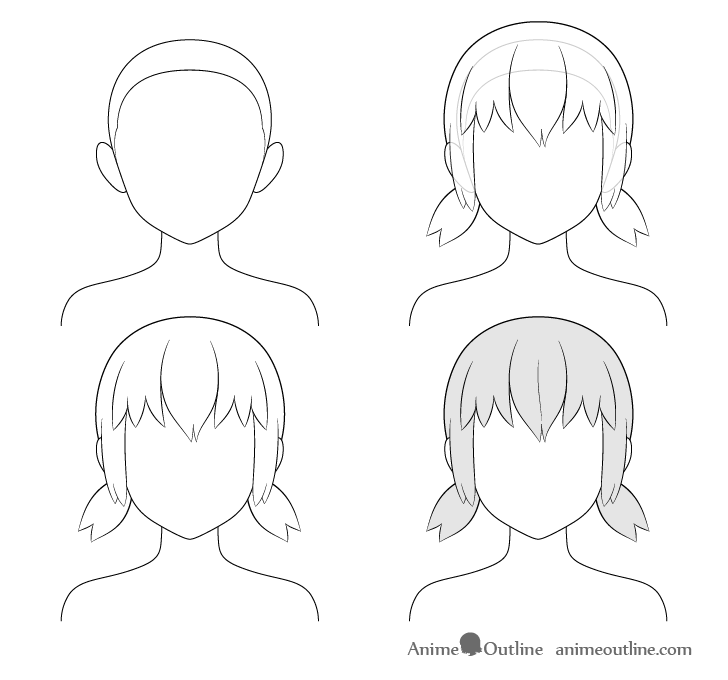
Step 1
Offset by showtime making a drawing of the caput and an indication of the hairline. While in this detail hairstyle the hairline is less important as it's full covered by the hair it can notwithstanding help you ameliorate judge the overall length and position of the front and side pilus sections. Make the head/hairline drawing adequately light and so you can easily erase parts of it later.
Step ii
Depict the pilus correct over the top of the head and hairline as in the example above.
For this item hairstyle where the front section of the hair has been cut fairly curt you lot can describe information technology in relatively minor pointy clumps.
Make the "side hair" fairly long with information technology'south overall shape slightly curved. You can too carve up it into several smaller clumps towards the ends.
Draw the top part o the "back hair" pretty much post-obit the shape of the head (a flake of a altitude abroad from it) and then widening until it's finally hidden behind the shoulders.
Step iii
Erase the parts of the head subconscious by the hair and add a few lines to show the inner folds of the front and back hair. You volition more often than not want to position these folds in between the hair clumps equally that is where these will usually tend to grade in real pilus.
Step 4
Next add some folds in the "back hair" to give a bit more than definition of it'due south shape as well so that it does non merely look like a flat cutting out.
You can also add together some basic shading to make the pilus stand out a little bit more than once you stop the line drawing.
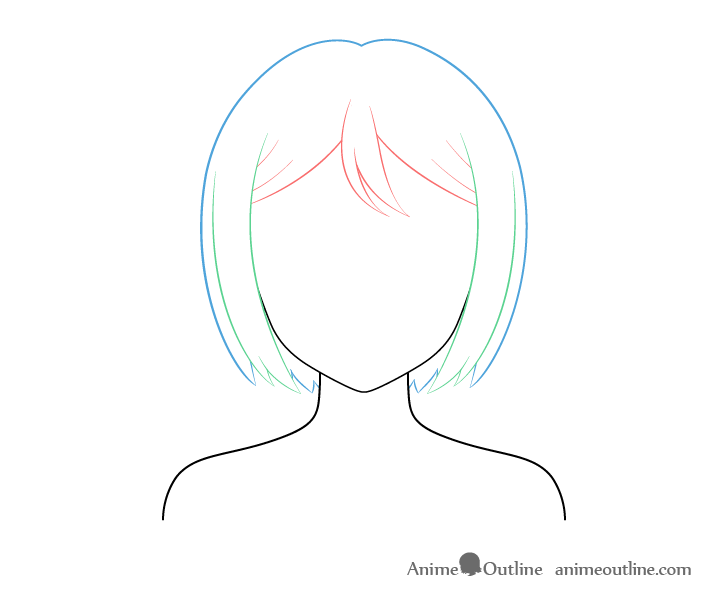
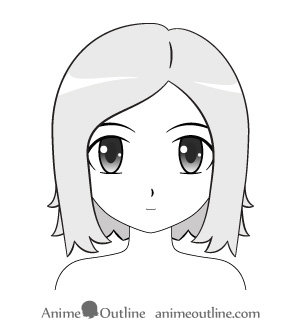
Drawing Brusque Anime Hair
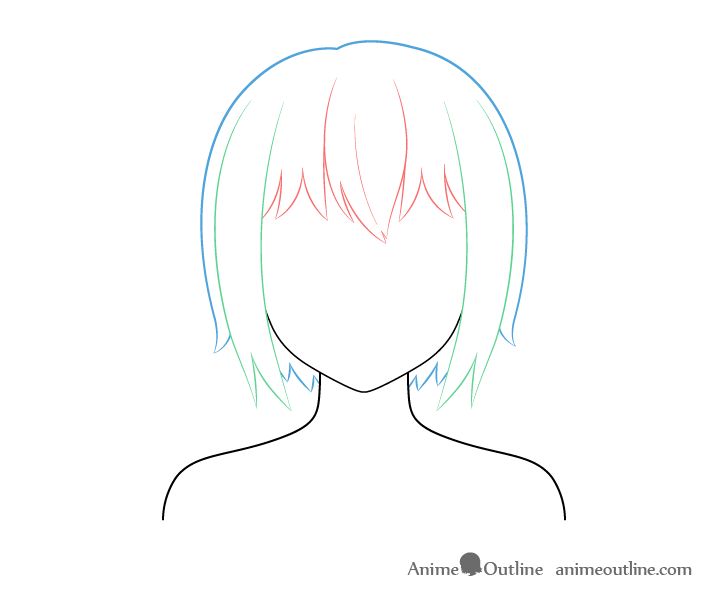
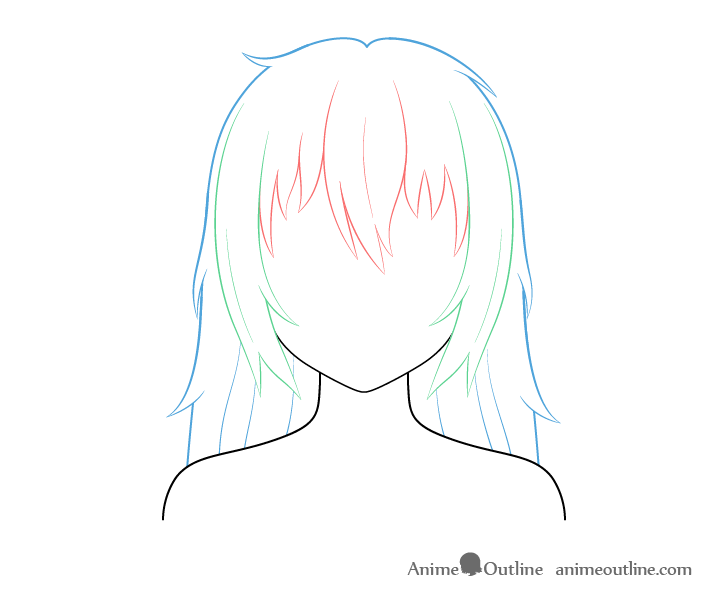
The short hair drawing example above is fairly similar to the long pilus with the hair once again broken down into three basic parts of front, sides and back.
The actual breakdown of the drawing process can be as follows:

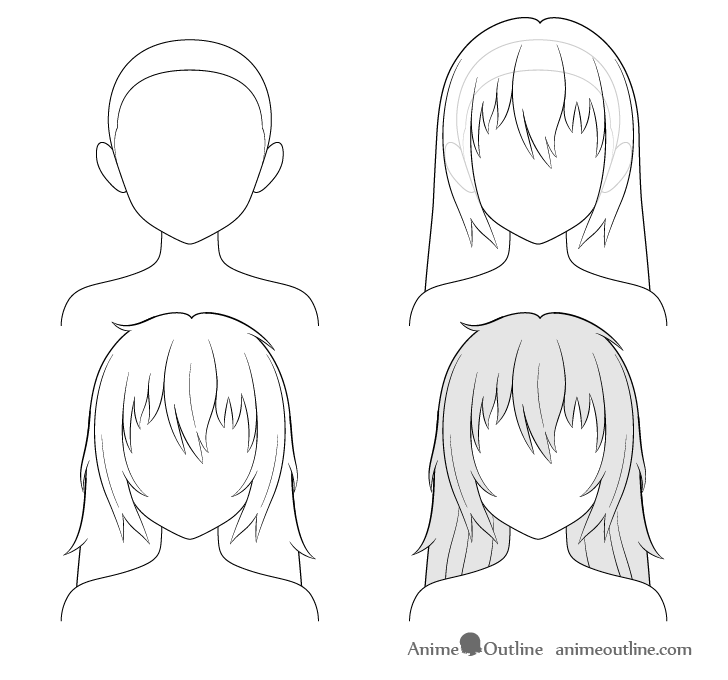
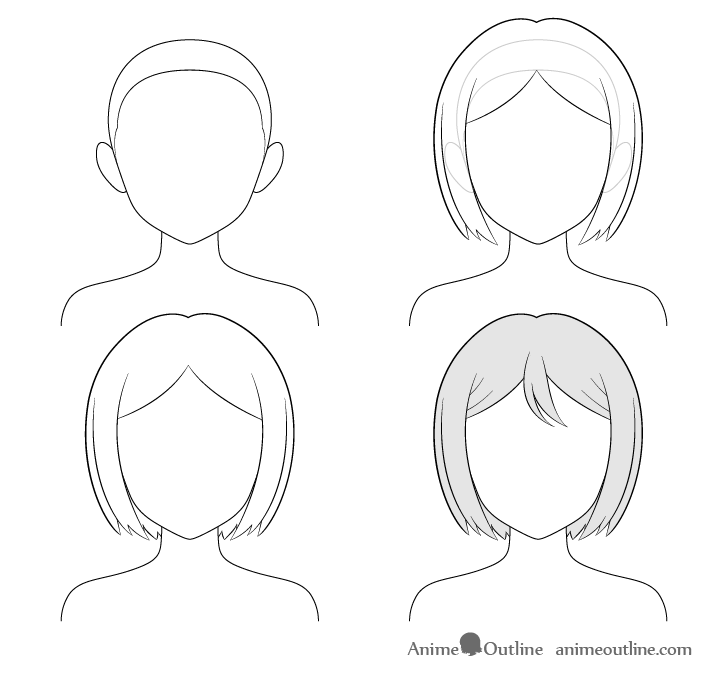
Step 1
Again start the short hair drawing with the head and hairline. Aforementioned every bit the previous instance the hairline volition non exist as of import here every bit it is in other hair styles simply can nonetheless be helpful.
Stride 2
Yet again very similar to the long hair draw the "front hair" section with a set of small clumps. For this particular case the pilus will be a flake more than messy and so the clumps volition bend more than in unlike directions. If y'all want neater looking hair you lot tin can describe them the same as the get-go example.
Stride 3
Aforementioned as before erase any parts of the caput hidden by the hair and draw the bottom portion of the back hair. Generally information technology's a adept idea to go out this section of the pilus for the terminal part of the line cartoon equally in the front view of the head it will be in the back backside most of the other parts of the pilus. If you try and depict it first you lot without the other hair to sort of "frame" its position you volition probably end up with some overlapping lines and take to practise actress erasing.
Stride 4
Add the inner fords (just i in this case) and if y'all like, some basic shading.
Cartoon Trimmed Anime Hair (Hime Cut)
For trimmed hair describe the pilus dodder with flat ends that look similar they've been cutting off by sissors.
For a neat look the dissimilar hair clumps should generally exist drawn pointing in the same direction as the clumps next to them and whatever shifts in direction should be gradual.
Step 1
Start by drawing the hair and indicating the hairline. For the "Hime Cut" the hairline will over again be covered past the pilus.
Step ii
For the initial drawing of the bodily hair y'all tin can start with the sides followed by the dorsum. Y'all can signal the front end section of the hair with only one line.
Pace 3
At present describe in some pocket-sized splits into the front and side parts of of the pilus to make them look more natural. Erase the line in between the splits when you are done. Y'all tin can too erase any parts of the caput that are covered by the pilus.
Step 4
Finally once more like to the starting time example add together some lines to the pilus in the back to testify information technology'southward diverse inner folds. Try and draw these with fairly random spacing and slightly varying curves. If you space everything evenly and make all the curves trace one another too closely the hair volition not look very natural.
Drawing Long Messy Anime Pilus
The long messy hair is somewhat similar to the first instance but with some extra hair clumps. Once more it can be divided upwardly into iii parts like all the other examples and so far.
Draw the long messy pilus as follows:
Step 1
As the other examples start by outset drawing the head and hairline. Drawing the hairline will help you lot make certain that none of the splits between the hair clumps for the "front hair" go as well far upwards.
Stride two
To brand the hair look more than messy describe the front pilus clumps pointing into dissimilar directions and of varying shapes and curves. You lot can draw some that are wavy and some that juts bend in ane direction.
Draw the very eye portion of these clumps reaching further down. You lot can do the same with the outer clumps on the sides of the front department. This volition once again requite more of an impression of pilus that has not been well groomed.
Step 3
At present describe in some additional hair clumps randomly sticking out of the back sections of the hair. This will brand the otherwise neat looking back hair wait messy too. You tin can as well add a pair (or more) clumps to the inner parts of the "side hair". You can either erase the outlines of the hair where you desire to depict these or add them and erase the overlapping outline afterwards. Next you tin can add together in some split up lines in betwixt the hair clumps same equally some of the other examples. To finish the line drawing again erase the parts of the face and head that are covered by the hair subsequently.
Step 4
As this example too has long back pilus you tin once again draw in some of information technology'south inner folds to brand that section look more like actual hair. You lot tin can besides brand them a chip more wavy than the other examples to once again make the pilus look more messy.
Drawing Anime Pony Tail /Tied Dorsum Hair
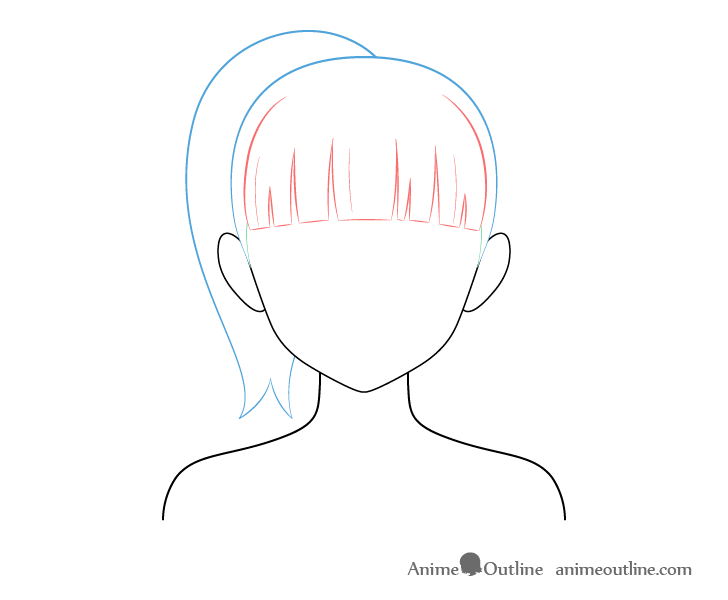
Another fairly mutual anime hairstyle is the ponytail. Y'all will notice that there is basically no side hair in this particular example (other than the tiny $.25 of the hairline on the sides). And so the hair can pretty much just be splits into the front and back sections. The dorsum consisting of the pilus over the summit of the head and the pony tail.
Draw this type of hair as follows:

Stride 1
Draw the head and signal the hairline which for this hairstyle is slightly more important than the previous examples as some of it will be visible in the final cartoon as already shown.
Step 2
You tin can pretty much frame the front end hair for this hairstyle with just 3 curves. 2 for the sides and 1 for the lesser. As mentioned at that place is very little side hair in this example as the hair is pulled back revealing parts of the hairline.
Draw the dorsum hair only slightly over superlative of the head somewhen merging into the sides.
Though usually pony tails will face directly backwards for anime hair you can describe information technology slightly more to one side so that information technology's shape is more visible. Otherwise the pony tail can just look like a bump on the head. Yous can draw the pony tail with a sort of question mark like shape. You tin also add a small-scale carve up at the end.
Step iii
Aforementioned as for the "Hime Cut" draw in some small splits into the front section of the pilus and erase parts of the bottom line of the "front end hair" to brand spaces in betwixt them. Besides erase the parts of the head subconscious by the hair.
Step 4
You can again requite the pilus some light shading if yous like. You tin as well optionally draw in a few more than lines into the hair to make information technology await a footling more carve up up than the "Hime Cut" which tends to take more than dense "forepart hair".
Drawing Anime Hair Over One Eye

For the hairstyle with hair over one eye you can yet once more split the pilus into the forepart, sides and back. In this style the front department of the pilus will be fairly large and sort of merge into the "side hair" next to the covered center.
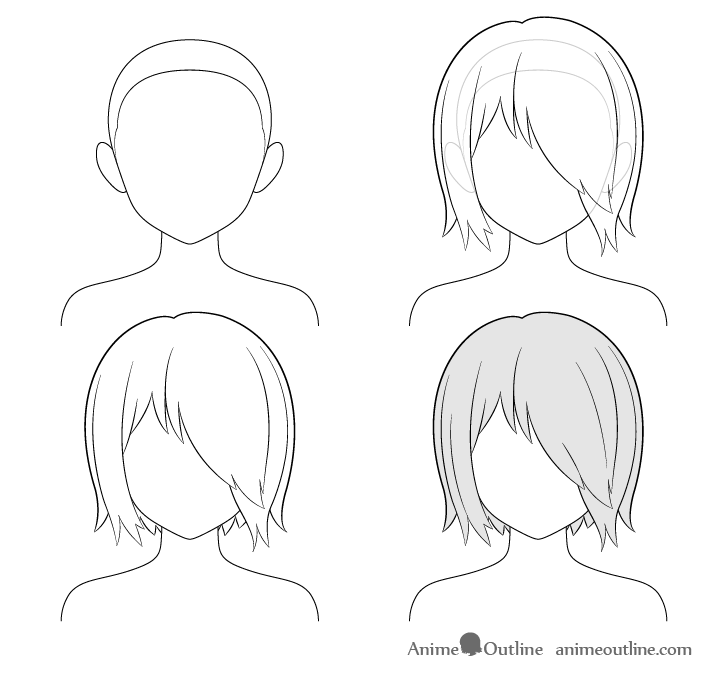
Step 1
Describe the head and the hairline same as the other examples.
Step 2
For this particular hairstyle draw the front hair clumps going far enough downwardly the face up to fully embrace one middle. For the "side hair" you tin draw the section on the side of the covered eye somewhat blending into the front pilus.
Depict the back hair carve up into tow curves that pretty much hug the shape of the caput equally they go down eventually sticking out in clumps to each side.
Footstep 3
For the very lesser section of the front hair draw a few small clumps sticking out effectually the summit of the cervix area. Erase any overlapping lines from the head that should exist hidden by the hair when you lot are done.
Step 4
To wrap upwards the drawing you tin can again add together a few lines to show some splits and curves of the pilus going from betwixt the hair clumps.
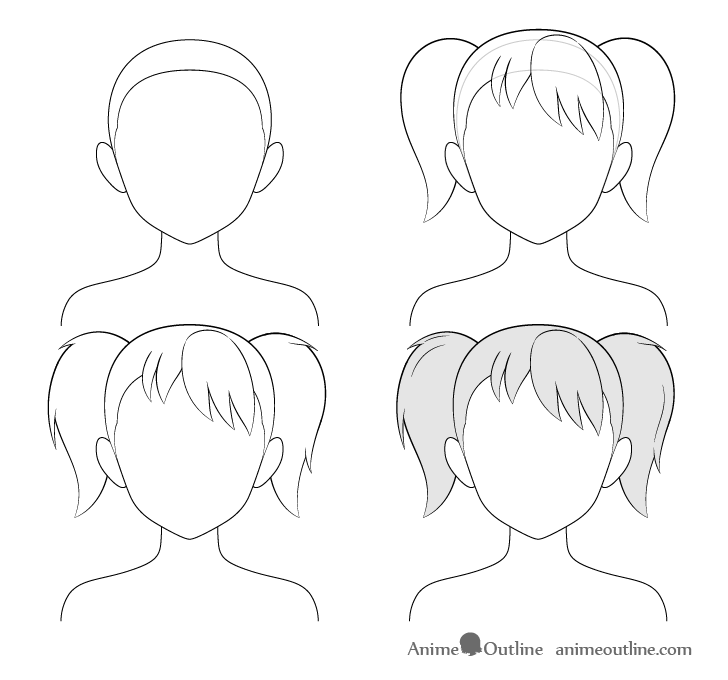
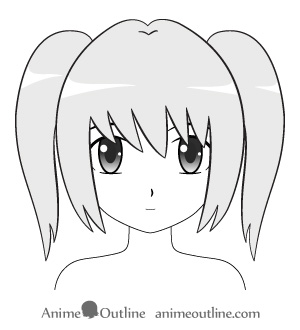
Cartoon Anime Pigtails
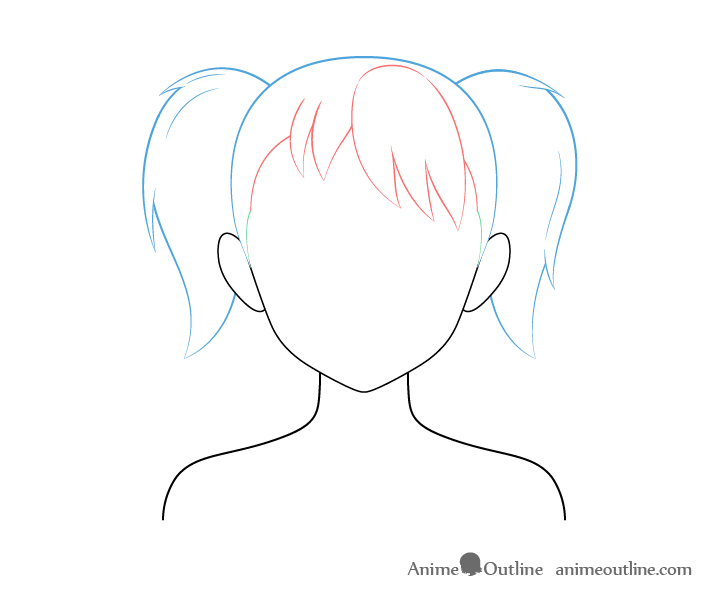
The pigtails are another very common fashion of anime hair. Same as the ponytail instance yous can see that this particular cartoon can pretty much be cleaved down into the front and dorsum section of the hair. With the "dorsum hair" split into the pilus covering the head and the pigtails. There are really merely tiny bits of actual "side hair".
Step 1
Draw the head and the hairline. In this case a big section of the hairline will be visible in the final drawing. It will likewise help us identify the front section of the hair.
Pace 2
Though most of the hair in this item example will be pulled back you can draw some clumps for the front department of the hair to just one side to make the hairstyle look a little flake more interesting.
As already mentioned at that place will pretty much exist no side hair other than the tiny bits around the top of the ears. Describe the top/back department of the hair blending into that side hair.
For the actual pigtails describe them similar to the "Ponytail" example vaguely resembling 2 questions marks in their overall shape with one beingness flipped over.
Footstep 3
Now add some random hair clumps sticking out from the pigtails to make them await a piffling more interesting and erase any overlapping lines that this creates. Also erase the outline of the head where it'south subconscious by the hair.
Pace 4
Add a few more lines to indicate some folds in the pilus to the pigtails and optionally some shading.
Drawing Neatly Combed Anime Hair
This hairstyle tin can once again be split up into three parts with the front, side and dorsum hair. The front section of the hair however is a little different from the previous examples.
Step i
Draw the caput and hairline. The hairline in this example will be peculiarly useful for placing the front end part of the hair.
Step ii
Draw the side sections of the hair with steady cures somewhat hugging the shape of the confront. Roughly from the eye of the hairline draw two curves going downwards towards the "side hair".
This volition be the "front hair" tucked underneath the sides which will be combed downwardly over top of information technology. Draw the back hair with a fairly obvious split in the center with two curves going in each management. This will help show that the pilus has sort of been neatly combed to each side.
Stride 3
Add some small hair clumps for the bottom background pilus.
Step 4
Finally you can add a little clump of pilus hanging down from the middle of the forepart section of the hair. As sometimes the hair in that area will be to brusque to exist tucked under the sides and part's of it may hang downward. This will make the hairstyle wait a little more than natural and interesting. Finally add together some fold lines to the front sections of the hair going to the sides to assistance show that the hair is tucked underneath there.
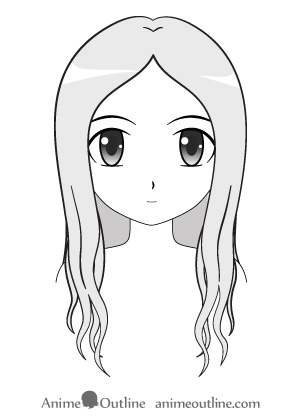
Drawing Curly Anime Pilus
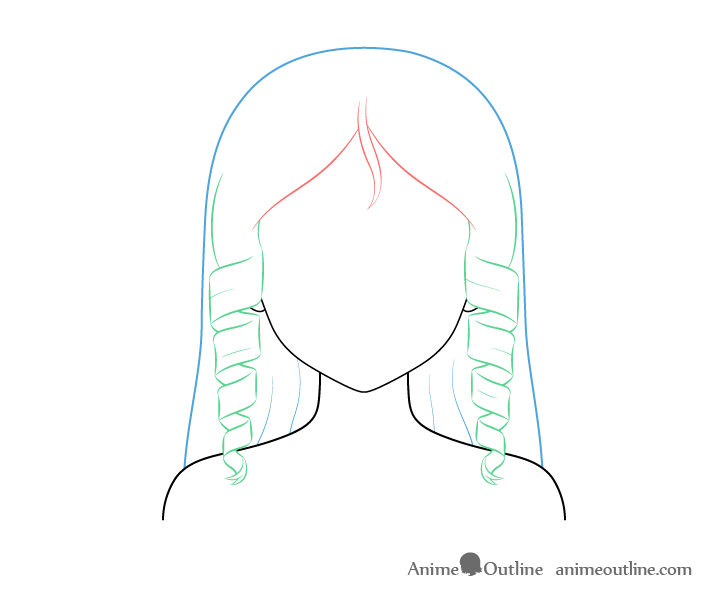
Curly hair is probably the most challenging anime hairstyles to depict. This item hairstyle tin can over again be separate into the front sides and back with the front hair beingness like to the previous example.
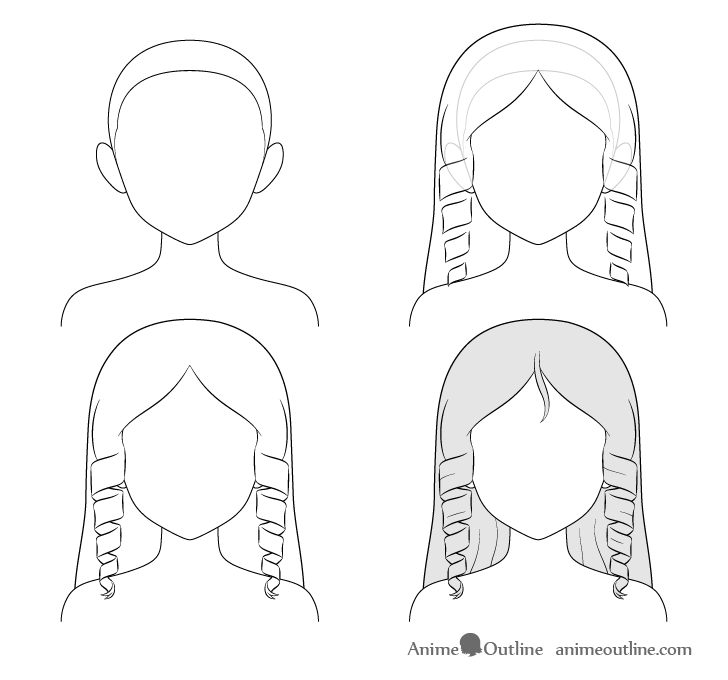
Pace 1
Start the drawing the the head and hairline sketch.
Stride 2
From the hairline draw 2 lines going towards the sides of the head to bespeak the front hair. To show that the hair is curly you can depict these lines in light waves.
The "side hair in this example will be completely curled. You can first draw some lines at the base of the curves to betoken the volume of the hair that will then transition into the sort of "spires" of hair below.
To draw the actual curls kickoff draw the parts of them that are in the foreground. You lot can sort of think of them every bit a cone that's been sliced on an angle and pulled apart.
Step 3
Now erase whatsoever parts of the head hidden by the pilus to avoid confusion and add the background lines of the hair curls. You lot can remember of these as the forepart parts filled over.
Finally you lot tin depict some splits at the end of each curlicue.
Step 4
For the final footstep you can draw a little squiggle of hair hanging downwards from the center of the front section and add together some lines to the lesser of the background pilus to indicate some inner folds. Make these lines more than wavy than in the previous examples to show that the hair is curly.
Cartoon Anime Hair Buns
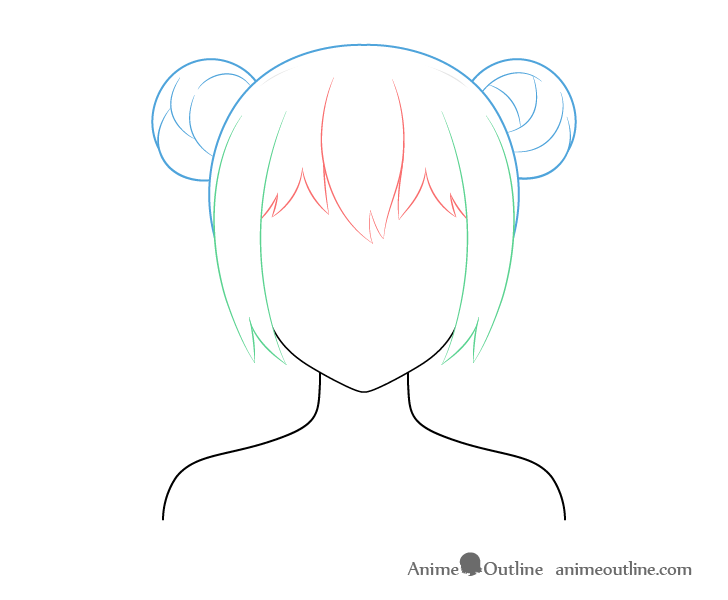
The hair bun'due south are somewhat more than rare but still pop style of anime pilus. This style tin also be split into the front, side and back pilus.
Y'all tin can draw the hair buns hairstyle as described beneath:
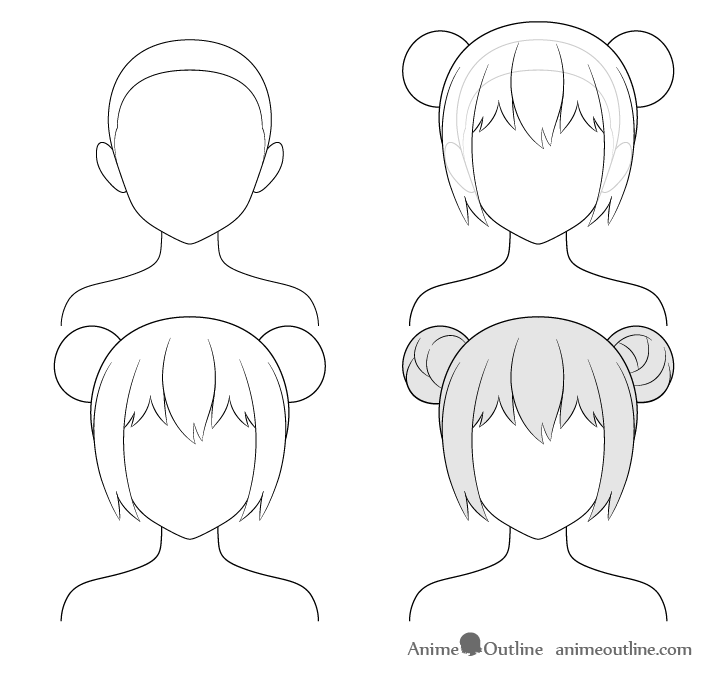
Step ane
Once again start the drawing with the head and hairline.
Step 2
Draw the "front end hair" in pocket-size clumps pointing towards the centre of the confront and the sides same equally most of the other examples.
Draw the "side hair" with light curves somewhat "hugging" the face.
Make the "back hair" pretty much curve around the shape of the head.
Finally draw the actual hair buns with somewhat of an oval shape for each with part of it hidden behind the "back hair".
Step iii
For this footstep only erase the parts of the head that are hidden by the hair
Stride iv
Draw some o the inner curves of the hair bun. You tin can pretty much depict these at random but endeavour and somewhat follow the outer curve of the bun with at least a few lines. This volition aid create that sort of "ball of yarn" look that hair buns tend to take.
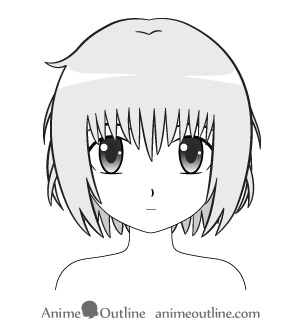
Drawing Curt Messy Anime Hair
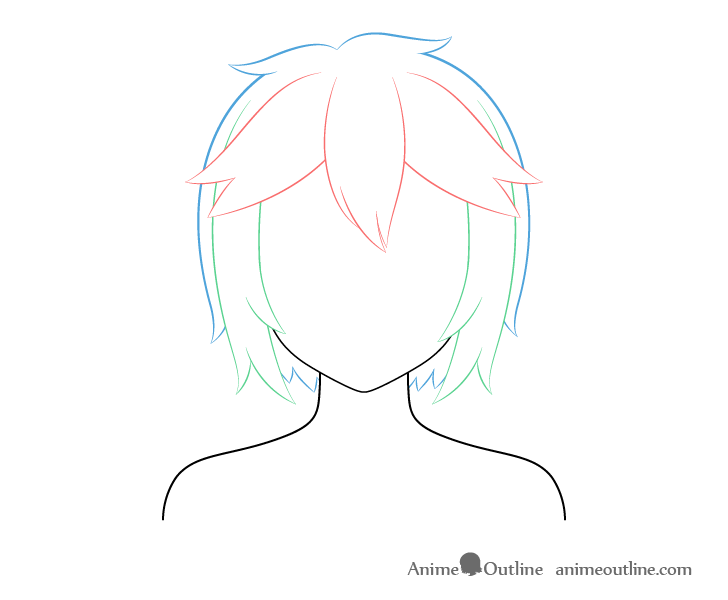
The short messy hair is once more easy to split into the forepart, side, and dorsum sections.
You tin can draw it in the following steps:
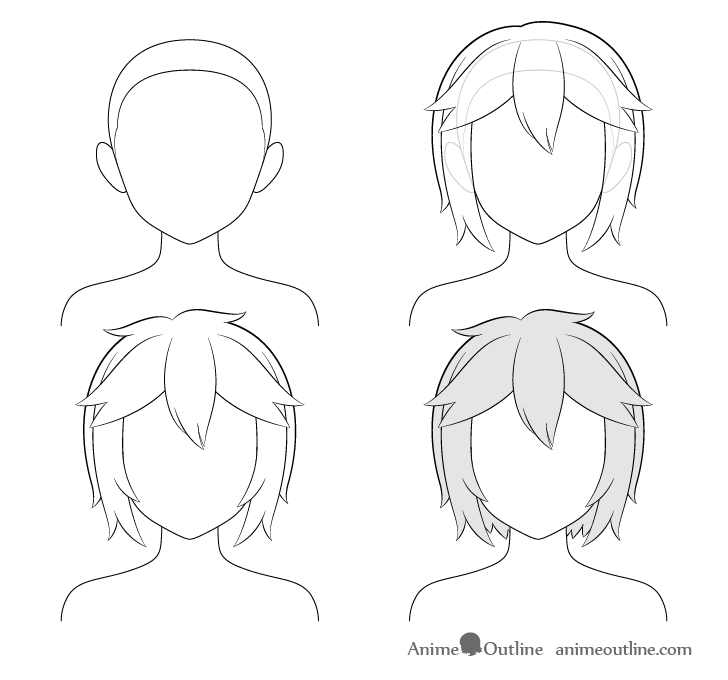
Step i
Same as other examples draw the head and hairline to start.
Step 2
Describe the front section of the hair with the outer clumps sticking out to the sides instead of resting on the forehead like about other examples.
Add the side sections with the splits at the ends sticking out in reverse directions.
Draw the background pilus with a slightly split to one side and the two curves that come out of it eventually transitioning into hair clumps on each side of the head.
Step 3
Now add a pair of wavy clumps to the upper split are of the background pilus and some other pair of clumps to the inner areas of the "side hair". Erase the parts of the hair where you add the clumps and erase any parts of the caput/face lines covered past the hair.
Step 4
Add the bottom portion of the background hair drawing in small clumps pretty much the same every bit the other shorter pilus examples in this tutorial.
Drawing Curt/Low Anime Pigtails
For the final example of anime pilus in this tutorial we take the short/low pigtails. Equally about other examples in this tutorial these tin can once more be split into the sides, front end and dorsum/meridian pilus.
Draw this particular hairstyle equally follows:
Stride one
Start by drawing the head and hairline every bit all the other examples.
Pace 2
Add the front end section of the hair get-go as in this case it volition exist sticking out a fiddling more than to the sides overlapping the side sections. Draw the "front hair splitting into fairly modest clumps and practice the same for the ends of the "side pilus".
Make the "back hair" pretty much following the shape of the head.
Finally add the pigtails at the bottom of the head with minor splits at their ends.
Footstep 3
Make clean up the drawing by erasing the parts of the head hidden past the hair.
Pace 4
Add together some lines to show the heads inner curves and fold. In this case just one for the front hair clump.
Hair Highlights
Hair highlights can really brand hair stand out fifty-fifty without any additional complex shading and are fairly like shooting fish in a barrel to add.
For drawing them check out:
Dissimilar Means to Draw Anime Hair Highlights
Decision
When drawing hair it tin can be very helpful to organize information technology into divide sections. Non only will this assistance you lot get a better grip on how to draw it but information technology will also permit you to more easily modify the hairstyle by irresolute its various parts. For more than hairstyles you tin can experiment by mixing different parts of the front, side, and back sections of the hair in this tutorial or by adding entirely new designs.
For shading these hairstyles see:
How to Shade Anime Pilus Footstep by Step
For more on drawing anime and manga way hair meet:
- How to Draw Anime Hair Blowing in Different Directions
- How to Describe Anime Hair in 3/4 View Stride by Step
- How to Draw Moisture Anime Pilus Step by Step
If you would similar to learn how to depict the head with all of the facial features cheque out the:
How to Describe an Anime Girl'southward Head and Face
For drawing hats and head ware meet:
How to Draw Anime Hats & Caput Ware
This tutorial has been nearly completely redone and updated with new art but you lot can run across the erstwhile examples below.


Source: https://www.animeoutline.com/how-to-draw-anime-and-manga-hair-female/
Posted by: engelhardtbusert.blogspot.com
0 Response to "How To Draw A Girl With Brown Hair"
Post a Comment